Friday, October 08, 2010

Net Beam, Anchor Roller, Cockpit, Motor Mount and Deck Mock-Up

The weather has been spectacular here in Mississippi since I moved my hulls out of the shed.  They haven't seen a drop of rain so far, and the humidity has been low and the temperature just right for epoxy to cure.  I'm working on a lot of miscellaneous projects that had to wait until the boat was assembled for correct measurements and final decisions on details.  One of these projects included mocking up the cockpit by temporarily hanging the side panels in the space between the mast beam and the aft beam.  I was then able to screw a temporary 2 x 4 in place to represent the height and fore and aft placement of the motor mount, so I could check clearances and make sure it would be the right depth in the water when down and still tilt up high enough clear the surface when sailing.  The motor I'll be using is a Nissan 6HP Extra-Long Shaft 4-Stroke. 


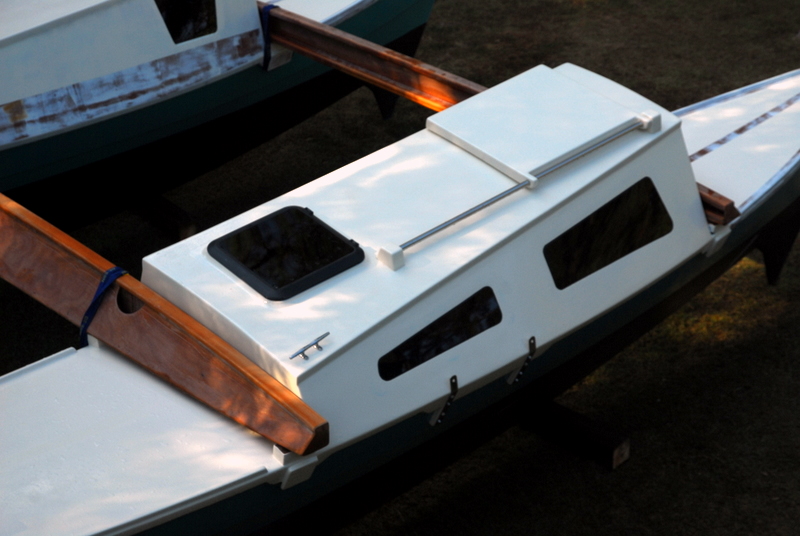
I think it's going to work out fine in the space shown for the motor well in cockpit drawing in the plans.  Because of the 25-inch shaft, I can mount it a bit higher, which will help prevent it from drowning out in big waves.  It will still be pretty low overall in relation to the top of the aft beam, as you can see here:


The 25-inch shaft will keep the prop deep in the water, with cavitation unlikely.  Mounting it forward of the aft beam will also help with this and with proper weight distribution.  The board laying across the skids that the hulls are resting on in front of the prop shows that the prop can't hit bottom before the hulls do. 


I've also designed and built the aft net beam in the past few days.  I scrapped the idea of using the aluminum pole I had for this, as a wood-composite beam will be easier to mount things to and to finish in a way that matches the boat.  I used a V-shaped lamination for the bottom, fit into notches cut in the stern post.  The other board is the inner top plate, beveled to fit into the V.


Here is the next assembly step, putting the inner top plate in place with epoxy.


This  view of the unfinished end shows the final cross-section of the beam.  Built of Doug fir, it's plenty strong and stiff while still lightweight because of the hollow area.  The piece of wood on the forward edge that stops at the inside of the sternpost is a teak trampoline lashing rail that will be drilled on 3-inch centers for the aft tramp lacing.  I'm using teak for all the  lashing rails as the holes will be exposed to the weather and most other woods would rot in this use. The sharp edges of the beam corners will get a smooth radius and then the entire beam will be sheathed in fiberglass cloth.


Here's view looking aft to show how the beam fits.  The triangular design with the low, flat top will allow plenty of clearance for the tillers.  There's a lot of usable space back there between the sterns and the aft beam.  I can't imagine not having a net beam to take advantage of it.  Mine will have a drop-down ladder in the center with tramps to either side. 


Anchor handling and storage is often overlooked in the building phase of these boats, but any cruising boat, no matter how simple, relies on good ground tackle, and that ground tackle must be accessible and easy to handle.  To that end, I've built a custom anchor roller for the forward beam that nicely accommodates my 22 lb. Delta plow anchor.  Anchors in this configuration are difficult to stow anywhere but on a roller, as they are bulky, awkward and take up too much space inside lockers.  The roller housing is assembled here for fit, but will be removed for finishing before it is then filleted and glassed onto the beam. 


Here's the anchor, salvaged from my previous boat, a much heavier 26-foot monohull.  The Delta should be more than adequate as the main anchor on the Tiki.  If I were buying a new one, I would probably go with the highly-regarded Rocna design.  As it is, I have this one, as well as a smaller CQR and a large Danforth.  All three will be on board with appropriate rodes.  At the top of the beam, there will be a teak block to receive the shank and hold it in position, and a cleat to secure it with a short line through the forward eye. 


Another big project will be building the slatted deck forward, between the mast beam and the forward beam.  I've decided to go this route in lieu of a trampoline, as it is so much better to work on and will last longer.  It will also cost about the same or less, as I have ordered locally-grown select-grade southern bald cypress for the material.  I considered teak, like David used on his Tiki 30 forward deck, but prices have really gone through the roof, especially for what little teak is available in my area.  The cypress will be lighter weight anyway, and should last a long time with care and proper construction.  Below, I have mocked up some of the longitudinal stringers out of scrap wood just to get accurate measurements on the amount of material I will need.  The longitudinal stringers will hang under the mast and forward beams.  Then deck beams across will support the planking, which will put the top of it about even with the built-in ledge on the aft side of the forward beam, making it about 3 inches higher than the adjacent decks on the hulls.  The whole assembly will be easily removable as a single unit to aid in disassembly of the boat.

Monday, September 27, 2010

Beams Meet Hulls!

Hey, check it out, this thing I've been building all this time really is a catamaran!


Yesterday, I brought the crossbeams from the garage where I built them down to the shed where the hulls were built.


Today the hulls were rolled out into the open and aligned in the middle of the space between the shed and the house, where I have enough room to work and to step the mast later when it's time for that.  I leveled them and blocked them up using the two-wheel carts I made and a hydraulic floor jack. 

  
All this went surprisingly well, even single-handed, again making me glad I went with the Tiki 26 instead of a larger design.  I can easily manipulate these hulls for maintenance in the future.


These beams are still unfinished, of course.  I have a bit of glassing and lots of fairing to do before painting them, as well as the completion of the extra bits for the mast beam, such as the mast step reinforcement and the dolphin striker.


At this point, the beams are just strapped onto the inside lashing cleats to keep everything level and secure.  I will use rope lashings as in the plans for the final assembly.  The beam blocks on the decks will have to be shaped to fit the underside of the beams for a secure contact surface.  This could not be done until I reached this stage where the hulls are aligned and leveled with each other.  Before the final fitting, I'll fine tune everything with a water level to be sure they are exactly level at all four ends. 


Another project will be finishing the paint job on the stern decks, which have non-skid and primer, but no finish coats.  Then I'll hang the rudders and paint them in line with the bottom paint and topside paint.  And then build the tillers and the tiller bar.


And, there's the small matter of the cockpit and cockpit seats with storage under, and the motor well.  Then forward decks, aft boarding ladder, tramps, etc....  But it's starting to look like a boat, and that's inspiring.


Saturday, September 18, 2010

Port Hull Outside

Yesterday I moved the port hull most of the way out of the building shed.  I was able to install the remaining two windows in each hull this week, despite my injured foot and ankle, so they are now fully "dried-in" and able to be left out in the open.  The starboard hull will come out next week after the sealant has a couple more days to dry.  I'm leaving the stern decks under cover until I get the non-skid and paint on them.  In the meantime, there is a lot of detailing to do on both the deck paint and the green topsides now that I have them out in the open where I can see and work free of the dust in the shed.  Here are a few pictures so you can see one of the hulls unobstructed for the first time:


The first step today was to wash all the dust off:


You can see that the stern deck here is not yet painted, only primed. 


I really like the way these flush-mounted windows came out....


This view shows the companionway hatch and opening hatch forward.  This is one Tiki 26 that will have lots of natural light and ventilation inside.

Wednesday, September 08, 2010

Window Installation Steps

I completed the installation of the two smaller forward, smaller windows at the beginning of the week.  Here are a few photos showing the procedure, as several people have emailed to ask about it since my last two posts.  This is my first installation like this, having learned the technique from David Halladay.  After asking him all my questions over the phone, I proceeded with it and it turned out great and was easier than it sounded.

First, here's a view of the prepared inner flange, as it might not have been clear from my last post how this was built.  The flange itself is made of 6mm ply, and is 1 1/4" wide all the way around the inside perimeter of the opening.  You can see from the shadow that it is set back from the inside of the opening.  This is because of the 6mm plywood spacer sandwiched between the flange and the opening.  This spacer allows a generous bed of the DOW 795 sealant to fit between the acrylic window and the flange.  The space is necessary to allow movement of the acrylic, which expands and contracts at different rates than the wood/epoxy around it.  


The painted area around the window opening is then masked with clean-release tape that won't damage the opening:


The acrylic window, which has been pre-cut and fitted, is now prepared for installation by Super-gluing several flat blocks of plywood to the paper backing that comes on it.  These blocks around the perimeter will hold the window panel flush with the outside of the cabin surface. 


On the inside surface it's best to remove the paper backing and tape it with masking tape so it can be pulled off easily after caulking.  The masking tape is cut back to the edge of the inner flange.  The glue surface of the acrylic and the inner flange is sanded and cleaned prior to application of sealant. 


 This photo shows how the window is held into the exact position in the opening by the glued-on blocks of plywood.  Paper masking tape is applied over the clean-release tape, as it glues better than the blue tape.  Then blocks of wood are Super-glued to the boat on the paper tape to hold the window in the center of the opening. There is a 3/16" gap all the way around the perimeter of the opening, and these blocks will maintain that position while the sealant cures overnight.


The forward window on the starboard side was done at the same time.  After getting the blocks set up, the sealant was applied to the flange and the windows set in place.  At this point the inside edge can be finished from inside the boat and the blue tape on the inside surface pulled away.


The next day, after the sealant has cured enough to bond the window in place, the blocks and the brown paper backing are removed.  Then the painted surfaces and the edges of the windows are re-masked with blue tape.  


The last step is to thoroughly fill the outer perimeter of the window, forcing the caulk into any voids left in the first application.  The excess caulk squeeze-out is then removed, and the perimeter is tooled with a small filleting tool for a nice, slightly-coved seam. 


At this point, the tape is pulled and the installation is done:


No screw holes to crack the acrylic or eventually leak, and no outer frames to trap water that could lead to rot.


Just a clean, flush surface that blends right in to the rest of the cabin sides.  With the huge amount of DOW 795 that it takes to fill between the flanges and the acrylic, there's little chance windows installed this way will ever leak or give any other kind of problems.

Monday, August 30, 2010

Final Word On Portlight Configuration

Once again, I've made a change to how the fixed portlights in the outboard sides of the cabin will be installed.  My portlight saga is beginning to resemble Neil Hawksford's long-lasting "tumblehome saga" in the building of his Tiki 38, Gleda

This is the final change though, and the modifications have been completed and the window panels will be installed this week.  I decided against the overlay method as described in my last post because with the outer ring frames removed, the openings were of course larger and to have enough bonding surface for the overlay style of installation, the plastic window panels would have to be 1.5 inches wider than the openings all the way around the perimeter, creating disproportionately large windows that would adversely affect the lines of the boat.  Though it took a bit of extra work, I decided to do it the right way and the way that windows are installed in practically all modern boats and yachts - with an inner flange for bonding so that the window will be flush with the surrounding cabin side surface.  This is what David Halladay recommended from the beginning and I should have listened to him then.  It is also the way the windows are fitted in the GRP Tiki 8-Meter, a design David and the Boatsmith crew have now built three examples of, counting the new one under construction in his shop now.

Following David's instructions over the phone, I made new inner flanges from 6mm ply.  The flanges must overlap the inside cabin surface around the hull by 1 1/4 to 1 1/5 inches to have sufficient glue surface.  Then they must overlap the opening by 1 1/4 inches to allow for enough bonding surface for the acrylic window panel, which is cut 1 1/4 inches smaller than the opening all around the perimeter to allow for expansion.   The two adhesives of choice are Sikaflex 295UV or DOW 795.  I'm using the DOW 795 as it does not require a primer and seems simpler to use.  Both are incredibly strong and quite capable of permanently bonding the windows with no fasteners.  The key is to bed the window panels on a sufficient thickness of the sealant to  allow for movement.  To achieve this, I laminated a spacer layer of 6mm ply between the cabin sides and the inner flange rings.  That way, when the windows are installed, there will be a 1/4" bed of sealant and the window itself will be flush with the outside cabin surface.  More explanation of this later when I do the actual installation and take photos.    Here, I am laminating the ring frames with the spacers to the insides of the cabin:


And this is how the inside frames look now that they are glued in with epoxy.  I don't have a shot of the interior side, but on the inside the frames were finished to a nice radius with the router and will be varnished along with everything else inside the cabin. 


The 1/4 inch smoked cast acrylic that I ordered for the companionway drop boards also arrived last week and I cut those to shape using my plywood patterns:  The inboard sides of the cabin are not completely faired or painted and won't be until I move the hulls out and fit the beams.  Because I don't know the exact dimensions of the cockpit and where the seats will land on the cabin sides yet, I will wait until I can mock that up for accuracy before making and installing the rail upon which the seats will rest on the cabin sides. 


The opening Lewmar portlights for the aft cabin bulkheads have also been dry-fitted and will be installed this week.


Friday, August 20, 2010

Moving Backwards and Forward at the Same Time

I've managed to put a lot of time into the project for the past several days, although it may not look like much from the photos.  The list of things to do in order to get the hulls completely closed in with all hatches and portlights installed has been long and seems to be growing.  But I'm looking at having both of them out of shed shortly, it's just a matter of getting all the paint coats on the various parts done and then installing these components and waiting for the sealants to cure.

I took a few steps backwards on the portlights, but I think it will be well worth it in the end.  I regret all the hours I spent messing around with a plan that I've now scrapped, but better to correct it now than have to do it sometime down the line when I'd rather be sailing.  The problem was the ring frames that I made to sandwich the portlights between.  For one, I didn't design them with enough clearance between for a proper thickness of sealant, and two, I made the mistake of glassing the outer frames on first, requiring the ports to be installed from the inside.  Attaching them from the inside is problematic in many ways, first to make this attachment strong enough, and second, to get a good seal.  Another reason for scrapping this idea is that further research and conversations with David Halladay regarding the materials used led me to the conclusion that Lexan is not the preferred lens material and that the ports should be instead made of cast acrylic, which is what all the major hatch manufacturers use.

So to fix all this, I first had to grind off these nice exterior rings that had been so time-consuming to glass and fair into the sides of the cabins:


After a few hours with the belt sander and then the 6-inch random orbital sander with 60-grit, I was back to a flat cabin side surface:


The new portlights will be the overlay style, the perimeters of the lenses overlapping the openings by 1.5 inches all the way around.  There will be no holes drilled and no screws or other mechanical fasteners - the lenses will instead be bonded with sealant the same way that most all modern portlights are attached.  I was skeptical of this at first, until I realized that this is the way large, heavy glass panels are often installed in skyscrapers and other structures, and until I saw first hand how well it has worked on some of the windows David and the Boatsmith crew have installed.  The recommended sealants are either Sikaflex 295UV or DOW 795.  I'm going with the DOW 795 because it is a one-part sealant that doesn't require special primers, as does the Sikaflex. 

My order of cast acrylic to make these from arrived yesterday.  This is great stuff compared to the Lexan I had before. It comes with a heavy paper protective cover on both sides that's easy to mark and stays in place while you're cutting and sanding.  Here you can see my plywood patterns used to mark the outline of the new windows.  The small piece in the foreground is a scrap from which I peeled away the paper.  It is smoked gray in color, a shade darker than the smoked gray Lexan I had.  This cast acrylic is more U.V. resistant and more scratch resistant than Lexan.  It's also stiffer so that it wont flex if a wave hits it, which could break the seal.  That's why hatch manufacturers use it.  If you step on a deck hatch it won't flex under the weight.  The only area where it is not is good as Lexan is in impact resistance, which is why Lexan is used in bulletproof windows.  Hopefully, no one will be shooting at me, so it's not an issue. 


This material cuts and sands well. I cut out the ports with a circular saw, then rounded the corners with the belt sander.


Another job completed yesterday was some major sanding of the stern decks, toe rails and sheer stringers, and then the application of the first coat of primer to those areas. Everything on the hulls and decks is now either painted or primed.  Today is the first sunny day we have had here in over a week.  I will spend the morning putting another coat of paint on the cabin sides, companionway hatches, and other small parts.

Thursday, August 12, 2010

Back at Work....

Once again I've had a long absence from posting here.  I miss the days when I was tackling this project every day with enthusiasm, and this blog was the only thing I had to do on the computer and online.  Lately I've just been putting in too much screen time researching and writing my newest book, which is coming along but still far from done.  It's hard to spend any extra time taking photos, processing them and posting on blogs, but I hate to leave those who may be building their own Tikis waiting indefinitely for my updates.  So to let you know I am still working on the boat, here is the latest:


The decision to switch from the standard shroud lashing pads in the plans to regular bolt-on, external chainplates created a lot of extra labor and expense.  But regardless of that, I firmly believe it is well worth it for the secure means of attaching the Precourt terminators and deadeyes I will be using for my shrouds, as discussed in an earlier post. 

I fabricated the chainplates myself to get the exact dimensions and fit I wanted.  They are 3/16" thick by 1 1/2" wide, and 12 inches long.  316 stainless steel plate is hard to drill, bend and polish, but eventually it was done, and I'm well-pleased with how they look.  I didn't want a highly-polished glittering yacht look, just the rugged purposeful appearance that externally bolted-on chainplates exude.  (Note that I painted over part of this section of the topsides when painting the sheer and cabin sides.  The green topside paint will be brought up to the bottom edge of the sheer stringer.  I just wanted to get everything in the way of the chainplates painted so I can permanently bolt them on.  It's easier to bolt them on at this point, before I install the portlights, as I can reach through the window openings to back up the lock nuts on the inside - important considerations since I'm working alone).


This morning I completed the backing plates for all the chainplates and bolted them up to check fit.  They will be removed and then permanently installed with 3M 5200 as soon as I polish the backing plates a bit.  Then the windows can go in as soon as that's done.

Here you can see the clearance at the tops of the chainplates for the Precourt terminators.  None of the ready-made chainplates I could find, like Schafer's, had enough length above the sheer to keep the terminators from hitting the cabin when the shrouds go slack.  These do.  Note also that the pin size for the terminators is 1/2 inch.  This will certainly be as strong as any part of the rig.  Each chainplate is through-bolted with four 5/16" bolts. 


Here's a view of the inside backing plates in the starboard hull.  I didn't want to use individual fender washers for this application, as it is all too common to see them literally compressed into the wood by the strain that is put on the chainplate bolts under load. (This part of the interior is still only epoxy coated.  It will get sanded and faired and then finished with varnish). 


I'm also preparing to permanently install the companionway hatches.  Here, they have just received the first coat of paint after fiberglassing, fairing and priming:


The cabin tops and coamings are done.  It's hard to see the edges in these photographs, but I've laid-out a non-skid pattern for the walking surfaces on the cabin tops.


Here you can see the non-skid somewhat better.  This was the final paint coat that I applied this morning.  When this has had time to completely dry, I will permanently install the Bomar hatches in the openings on the forward ends of the cabins.  I placed an order yesterday for the remaining primer, paint and sealants to complete all these jobs.  Within a couple of weeks I should be moving these hulls out in the open to make room in my shed to bring in the beams that are still in my girlfriend's garage where I built them.  I still have some sheathing and fairing work to do on the three beams before they are ready to prime and paint.