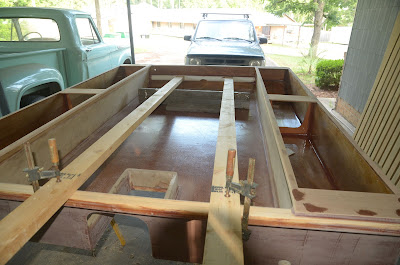
My focus for the past week has been on getting the structure of the cockpit finished so I can fit the seats/hatch covers for the storage compartments and finish the glassing and fairing of the interior of it. One important consideration in the cockpit is working out the boat's electrical system and providing for wiring between the two hulls and to the mast. The house batteries will be mounted in the starboard stern cockpit locker, adjacent the navigation station in the starboard hull, where there will be a 12-volt switch panel to control all circuits on board. To get the wiring from the cockpit into the hulls while still keeping the boat demountable, I'm using David Halladay's method of PVC pipe stubs glassed into the cockpit compartments and hull sides, with rubber inner tubes and hose clamps sealing out the water. More on those connections later. First, I had to work out getting the necessary circuits from the starboard side of the cockpit to the port side, as well as to the mast foot for those wires that have to go to the masthead. Here is the sawn 2-inch PVC pipe I'm using for that, glassed into the joint at the top of the slope on the forward end of the cockpit:
You can see the hole going into the port side cockpit compartment, and the cut-out at the bottom that will be the exit point for the masthead wiring. Here, I've held it in place with pressure from a couple of 2 x 4s clamped in place while the fillets dry:
All the PVC wire runs will be glassed over, faired into the adjacent surfaces and painted, but after gluing this one in, I had to move the cockpit to the boat to check some other dimensions.
The slot in the bottom of this wire run will be further protected from water entering by the addition of this compass housing I've built to mount my lighted steering compass. This compass was salvaged off the wreck of my destroyed monohull, Intensity, and somehow came through Hurricane Katrina unscathed. It will be a nice addition to Element II:
While I had the cockpit in place hanging from the beams, I went ahead and made four teak locating/hold-down blocks for the four corners of the cockpit. You can't see them completely here, but each block is L-shaped, so that it not only locks down the cockpit to prevent it from lifting, but all locks the sides to prevent lateral movement:
The next step is building the coamings for the cockpit compartments and finishing the side deck pieces that span the gap between the cockpit sides and the hulls. Here you can see the starboard side deck in place:
These side deck pieces will be removable for installation of the cockpit when the boat is assembled. I've worked out a design for the compartment lids/seats, in which they will be permanently hinged to these side decks, reducing the weight of the cockpit for transportation and facilitating a faster assembly time. More on the details of this when I get them farther along:
Here's a overview of the cockpit with all these various additions. Looking forward:
And looking aft. Note also the two rails that span the gap between the aft beam and the net beam. A boarding ladder will swing down between these, and trampolines will fill in the gaps on either side:
Here's another view of those ladder rails from astern:
The cockpit is now back off the boat and I've finished fitting and gluing in the coamings for the hatches over the storage compartments:
Here are those side deck pieces again, temporarily clamped in place. They will fasten to the outer coamings like this in actual assembly, the outboard edges resting on the support rails glassed on the inboard cabin sides of the hulls:
Sunday, May 13, 2012
Subscribe to:
Post Comments (Atom)


3 comments:
Looking great Scott!!!! But man you must have great eyes to put that compass so far forward. I've found in heavy weather I want the compass about 6" from my nose. The GPS units I've used have horrible realtime update for heading so its to the compass as it is the only thing for keeping a semi straight course.
Ed
Hi Scott, Curious what thickness of plywood you'll use for the cockpit locker lids? Are you using stringers to strengthen. I can just imagine the abuse they are going to get:)
Ed
Hi Ed, the cockpit lids will be 12mm plywood with no stringers or stiffeners. These lids must be strong enough to be walked on and as you say, will get a lot of abuse. David used the same for his Tiki 30, Abaco and they worked out fine.
Post a Comment