Even with the added seat boxes, the cockpit is not too heavy for me to handle single-handed. It is awkward because of its size and shape though: 8 feet long by 6 feet, 3 inches wide. I tipped it off the saw horses where I'd been working on it and moved it with a dolly to the backyard. There I was able to pull it over the grass to position it between the hulls and fit the forward edge to the mast beam:
I got it up to the lip on the mast beam by lifting it from the front with a rope and reaching over the beam with a ladder to pull it into place:
Then I lifted the stern end up high enough to put a small saw horse under it:
With it in this position, I could then set the rear beam in place, tilt the beam back while reaching over it with one hand to grab the top of the motor opening, and lift it up high enough to lock the beam back in place. I really like the way the cockpit is captured by the beam flanges. It's a simple and secure design. In this photo you can see the two 1.5-inch scupper holes I drilled in the aft end of the cockpit for drainage.
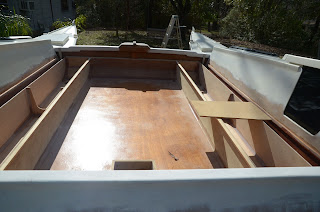
Here's a view from above showing the new compartments. There will be lots of storage space in these.
Looking forward, the board on the starboard side is just a scrap used to test the seating position. The gap between the cockpit edges and the hull sides is just a few inches. Today I came up with a simple and elegant solution to sealing this off in a way that will allow for dry storage compartments under the seats and no spray shooting up from the bottom when going to weather in rough conditions. I'll begin work on that tomorrow and will post when I have new photos.


3 comments:
Hello Scott,
I am Philippe from france, I live near La Rochelle on the west coast.
You are doing a great job really.
When do you think launch your boat.
I am dreaming of building a Tiki 26 too but for the moment its only a dream...i don't know if i am able to go to the end of this work.
Hi Phillippe,
Thanks. I plan to launch later this year, after the hurricane season is over.
Good luck if you decide to build a Tiki 26. It can be built much faster than mine. I have made a lot of changes and also have had many interruptions and long periods when no work was done on the boat.
Ciao ciao. Happy to hear you again. I'm writing to get a suggestion. I'm modifing my cockpit and I'm actualy copying yours. (I hope quality in not too far from yours:)).
You wrote the dimension of your cockpit are theese - 8 feet long by 6 feet, 3 inches wide – but you forgot to write how “high” it is. I mean how high is this part to avoid outboard's ventilation and in the meantime to keep the bottom high enough on the wave.
Post a Comment