Thursday, January 26, 2012

Test-fitting the Cockpit with Seat Box Additions

I finished fiberglassing the exterior of the cockpit box yesterday, so it was rigid enough to move it back around to the boat today to hang it from the beams and check the fit.  This was necessary to measure for the hatch coamings in the under-seat compartments and for the flanges on either side where the cockpit will mate to the hulls.

Even with the added seat boxes, the cockpit is not too heavy for me to handle single-handed.  It is awkward because of its size and shape though: 8 feet long by 6 feet, 3 inches wide.  I tipped it off the saw horses where I'd been working on it and moved it with a dolly to the backyard.  There I was able to pull it over the grass to position it between the hulls and fit the forward edge to the mast beam:


I got it up to the lip on the mast beam by lifting it from the front with a rope and reaching over the beam with a ladder to pull it into place:


Then I lifted the stern end up high enough to put a small saw horse under it:


With it in this position, I could then set the rear beam in place, tilt the beam back while reaching over it with one hand to grab the top of the motor opening, and lift it up high enough to lock the beam back in place.  I really like the way the cockpit is captured by the beam flanges.  It's a simple and secure design.  In this photo you can see the two 1.5-inch scupper holes I drilled in the aft end of the cockpit for drainage.


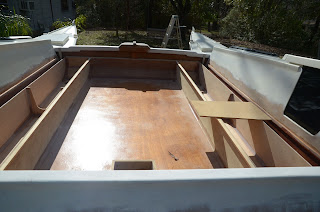
Here's a view from above showing the new compartments. There will be lots of storage space in these.


Looking forward, the board on the starboard side is just a scrap used to test the seating position.  The gap between the cockpit edges and the hull sides is just a few inches.  Today I came up with a simple and elegant solution to sealing this off in a way that will allow for dry storage compartments  under the seats and no spray shooting up from the bottom when going to weather in rough conditions.  I'll begin work on that tomorrow and will post when I have new photos.


Tuesday, January 24, 2012

Great Weather for January

It's been unseasonably warm here for this time of year, so I've been taking advantage of the good conditions to move forward with the cockpit sheathing and other epoxy work.


I completed the under-seat storage boxes that I added to the cockpit last week.  All the interior joints have been filleted, a fairly big job with a surprising 56 linear feet of fillets to make, counting the vertical joints and both sides of the center dividing partitions.  Those interior compartments will also get fiberglass sheathing, but first I wanted to flip the cockpit over and glass the exterior.  This will allow me to safely move it around to the boat and hang it in place for a final measurement before continuing with the seats that will also serve as hatch covers for the compartments.

All exterior corners were first rounded over with a router and filling and fairing completed where necessary.  As you can see, there is a small "chine" on each side of the bottom where the bottom panels of the side boxes overlap the main cockpit floor by one inch.  I did this to for ease of assembly when adding the side compartments and for additional stiffness and strength.  The overlap required a fairing fillet to allow the glass to transition smoothly from one surface to the next.  I've also wrapped the end support ledgers on the forward and aft ends of the cockpit in glass, bonding them to the panels with a strip of glass cloth that transitions from the bottoms of these to the panels over a small fillet.  The bottom of this cockpit is so big the sheathing has to be done in stages - at least for someone working alone.  I'm using 6oz. glass cloth in a 50-inch width.


Here's a view from the aft end of the cockpit, and you can see I've also moved the forward deck into the carport to get it out of the weather so it can be completely sanded and then treated with an oil finish.  The cypress deck has been exposed to heat and cold, sun and rain since I built it in October, so this allowed me to see how the wood was going to hold up and revealed a couple of bad planks that are wanting to check.  I'll replace those, but everything else looks great.


Here is the finish that will be applied to the deck:  Deks Olje D.1, as recommended by my friend David Halladay, of Boatsmith.  This is a saturating oil that is applied in multiple coats until the wood cannot soak up any more.  It will preserve the natural color of the cypress and help prevent checking and other problems, while still giving the footing advantages of a raw deck.


Other ongoing projects include finishing up the beams.  Since I added the forward deck, I had to make and install lashing pads on the mast and forward beams to support the longitudinal stringers under the center of the deck, and these have to be glass sheathed, faired and painted.  On the aft beam, I've added a ledger/rail on the aft side of the beam that will support the central boarding ladder and its rails and provide a place to drill lashing holes for the aft trampolines on either side of the ladder.  The rail is teak so that holes can be drilled without worry about rot.  The entire assembly is wrapped in glass and bonded to the beam fairing and bottom.


On the inboard sides of the hulls, I've glassed in 1-inch by 3/4-inch Doug fir stringers that will support the side flanges that will mate up to the cockpit edges at the level of the seats.  There are many different possibilities when it comes to how to join the cockpit sides to the hulls.  I had a long discussion with David about some ideas on this the other day.  An issue is that in rough conditions or at speed, water comes up through any gap in this transition, so the gap needs to be minimal, but tolerances cannot be so close that assembly and disassembly becomes too difficult.  Drainage for rain and spray running down the inboard sides of the cabins also has to be taken into consideration, especially if you intend the under seat lockers to be dry storage, as I do, rather than wet lockers with drains.  I have some ideas I'm still working out on this transition and the design of the locker lids/seats.  I'll make a final decision as soon as I can hang the cockpit back on the boat after I finish glassing the outside.  Here's a view of one of the inboard stringers:


Tuesday, January 17, 2012

Cockpit Under-seat Storage Compartments

I made a trip to New Orleans last week to pick up what should finally be the last two sheets of Joubert marine plywood to finish my boat: one sheet of 6mm to get out the bottom and side panels for the under-seat storage compartments and one sheet of 12mm to make the lids for these.  This lids will also be the seats and must be stiff enough to walk on and not warp or break - hence the 12mm for this purpose.  I went with the 6mm for the sides and bottoms of the boxes rather than foam core like the main cockpit floor or 9mm like the cockpit sides, since these will not be stepped in or carry excessive weight.


I debated long and hard about whether or not to add these fixed seat boxes to the central cockpit structure or build them as separate components to make transporting them easier.  In the end, I decided to make it all one unit as it will be stronger and easier to maintain overall, as separate boxes on either side of the cockpit would would require an extra wall of plywood and would create contact spots that would probably lead to maintenance problems in the future.

I began by glueing the bottom panels of the compartments to either side of the existing cockpit floor, then turning the whole assembly over and making the panels for the bow and stern ends, as well as a middle bulkhead that is cut-away to allow storage of long items like boat hooks and oars.  This assembly went together really fast since I used the super glue and accelerator I've mentioned here before to tab these parts in place rather than the more time-consuming stitch-and-glue technique.


Once the bulkheads and end panels were in place, I then attached the outside panels.  The completed boxes are 12 inches wide.  At this stage, I was able to begin making the structural fillets that would hold all this together and allow a smooth transition from bottom panels to sides for laying down fiberglass.  The glassing will be done after the fillets are completed.  The outside corners will also get a radius to allow glass sheathing over them.  In this photo you can see that I have temporary blocks of wood screwed to the central portion of the cockpit to allow it to hang between the mast and aft beams.  This was to check alignment as pictured in my last post so I could make and install stringers for the inboard cabin sides where the seats will bridge from the cockpit to the hulls.


In this photo, the temporary end stringers have been removed and the permanent ones glued in place with epoxy.  These will also be glassed into the rest of the structure for strength.  After this has cured,  I will hang the cockpit on the boat again for another alignment check and to measure for the seats/covers that will enclose these compartments.


The seats will be split into four separate covers - two on each side.  To keep these compartments dry in rain or spray, the seats will have one-inch side lips all around that will fit over raised coamings I'm going to build into the openings of the compartments.  They will hinge from the inside of the cockpit and overlap a flange permanently attached to each cabin side where it meets the cockpit.  More photos to come in the days ahead will make this clearer.  It's more work to make these cockpit seat boxes watertight, but it will be worth it to have the option of sealing them.  They will also be fitted with drain holes and removable plugs.