Thursday, August 11, 2011

Planing Deck Lumber and Building Parts for Another Tiki 26

I spent the afternoon surfacing all the cypress lumber that will be used for the slatted forward deck and aft boarding ladder.  This is something I planned to do a long time ago, but just got around to it.  It was a big job with my little 13-inch bench-top planer:


It's getting hard to find clear cypress like these select planks that are 8 and 12 feet long.  Even this stuff has a few knots and splits, so I bought and processed more than I think I'll need to get all the support rails and deck planks out.


Good cypress like this is not cheap, but it's a whole lot less than teak, and while it might not look quite as good or last as long, it's also much lighter weight than teak and I think it will certainly make for a nice deck.

The other thing I've got going on out in the boat shed is a paying job building Tiki 26 parts.  These are for a friend who is refitting his Tiki 26 in preparation for extensive cruising.  I've contracted to build two new rudders, the mast and the three connecting beams.  Yeah, I know I said before that building these Tiki 26 style beams is a major pain because of the difficulty of glassing them, but here I go again - building another set exactly to plan.  Here are all the center webs:


The cutting and assembly of these goes fairly fast.  It's all the filleting, glassing, fairing and sanding that seems to take forever - just like everything else on these boats.  In a couple more days, I'll have all the basic assemblies done:


Here you can see I've cut the rudders out of a sheet of 18mm Joubert ply.  Since I still have not hung my own rudders, also shown, I was able to use one of them as a pattern.  


 This job will of course cut into my building time, but will also add funds to my project.  It's a welcome change of course, from all the book writing I've been doing.  I just finished up the final revisions for my latest book that will be released in October, but I have a deadline for the next one looming in less then 6 months.  My plan is to work on my own boat alongside the construction of these parts, and hopefully complete the cockpit and decks and get the mast stepped during that time period.  

Sunday, May 01, 2011

Beam Sheathing is Finished

At last tedious work of wrapping all the beam parts in fiberglass is finished.  I'm now in the process of fairing and priming them:

Here are a few photos showing some of the steps in sheathing the webs, top plates and front fairings:

This photo shows the front beam to the left, with the custom anchor roller brackets I made, and the aft beam to the right.  In the middle is the much smaller aft netting beam.  The mast beam is holding the hulls together, so I have to swap them around and work on two at a time while one is on the boat.

Fairing all these surfaces is multi-step process of sanding and applying epoxy fairing compound.

At this point in the build, I've come to rely on these tools for just about all filleting and fairing:  They are all flexible blade drywall/putty knives of various sizes.  The round ended ones like the one shown here are made by shaping these cheap blades with a belt sander.  After using cardboard, wood, plastic and other filleting tools, I've discovered these work best and make the neatest fillets.  Best of all, they can be used indefinitely if you either wipe them clean when the epoxy is still uncured or sand it off afterward.

Right now, the partially-assembled cockpit box is serving as a work table and catch-all space for tools and supplies:

Here's a couple of shots of the aft netting beam, which still looks rough because it needs a lot of sanding:

I've added lashing cleats to the inboard sides of the hulls at the sheer stringer.  Since it is not part of the structure holding the hulls together, this beam will only get lashed on the inboard side.

Tuesday, April 12, 2011

Some Overdue Photos

I meant to post this months ago - a neat photo of the assembled boat that my sister took with her cell phone camera.  I like the way this turned out:


Despite the lack of posting here, some progress is still being made.  Lately this has been work on the three main beams and the aft net beam.  I've had fiberglass sheathing and fairing to do on all of these, as well as building added parts that go on them like the mast step.  Looking back at my last post that included photos, I realized too that I never got around to posting cockpit pictures.  I did get the foam sandwich floor for the cockpit laminated last fall, and most of the basic box is built.  I have yet to build the under seat storage boxes and complete the motor mount. I need to take more photos of the assembled cockpit, but here are some showing the beginning of laminating the foam core to the plywood skins:

First, I glued solid wood spacers around the perimeter and the motor well cutout.  Solid blocks were glued into the corners where scuppers will later be drilled.  All these wood parts are made of cypress.


Then, the 3/4" Divinycell  foam was cut to fit within the borders, and plenty of holes were drilled in it to allow excess air to escape during the lamination process.


I used everything heavy I could find for weights to hold it in place while the epoxy cured.  It takes a lot of evenly spaced weights to insure that the air is squeezed out and the foam is in good contact with the plywood gluing surface.


The top layer of 4mm plywood was then glued on after this cured.  I didn't get photos of that though.  Other work I've been doing lately is all the tedious glassing of beam surfaces and the add-ons like the anchor roller on the forward beam, shown here with unsanded fairing compound:

Here's a shot of the teak mast step, almost complete except for some final shaping and reinforcing fillets. 


These old style Tiki 26 beams take forever to sheath in fiberglass because of all the unnecessary exposed surfaces.  I would advise anyone building a new Tiki 26 to incorporate the newer Tiki 30 beam design, in which all the structural parts are inside the plywood panels, making for a smooth, triangular surface that is about 10 times easier to glass!  But one day in the near or far future, I will at last have these beams glassed, faired and painted. 

Tuesday, March 15, 2011

Project Update

I know it's been a long time since I've posted here and you may wonder what's going on with the Element II build.  Near perfect weather has returned and now is the time for boatbuilding here.  Look for new photos soon as I will be moving forward with the cockpit and other parts of the connecting structure in the coming weeks. 

The main reason I haven't had time to work on the boat is that I've been so busy with writing projects.  My latest book was just released at the beginning of this month and I have a contract for another one that is due to be completed by July 1.  In addition, I am simultaneously working on a novel that I also hope to complete around the same time.  Here is the cover of the recently released Getting Out Alive: 13 Deadly Scenarios and How Others Survived:


It is the latest in a series of survival-related books I'm writing for Ulysses Press, of Berkeley, California.  The first was Bug Out: The Complete Plan for Escaping a Catastrophic Disaster Before It's Too Late, which has been a great success and is in it's second printing and soon to go into a third. 

Some of you may wonder why I'm writing all these survival books and not more boat-related books, as paddling, sailing and boatbuilding are my true passion.  The fact is, while I don't consider myself a "survivalist," my previous experiences have put me in a unique position to write about these topics for those who are interested in them.  There has been a huge surge of interest in anything to do with survival here in the U.S. in recent years, and it shows no sign of slacking up. I've found that this subject matter is currently the best way for me to reach more readers, which is of course, the ultimate goal of any writer. 

Getting Out Alive is aimed at the armchair reader as well as adventurers who might need to know how to survive certain scenarios.  Check it out if like me, you like reading about other people's close calls and harrowing ordeals. 

My biggest challenge now is to find a way to balance writing time with boatbuilding time.  With the change to daylight savings time this past Sunday, I should be able to start making progress on the boat again.

Friday, October 08, 2010

Net Beam, Anchor Roller, Cockpit, Motor Mount and Deck Mock-Up

The weather has been spectacular here in Mississippi since I moved my hulls out of the shed.  They haven't seen a drop of rain so far, and the humidity has been low and the temperature just right for epoxy to cure.  I'm working on a lot of miscellaneous projects that had to wait until the boat was assembled for correct measurements and final decisions on details.  One of these projects included mocking up the cockpit by temporarily hanging the side panels in the space between the mast beam and the aft beam.  I was then able to screw a temporary 2 x 4 in place to represent the height and fore and aft placement of the motor mount, so I could check clearances and make sure it would be the right depth in the water when down and still tilt up high enough clear the surface when sailing.  The motor I'll be using is a Nissan 6HP Extra-Long Shaft 4-Stroke. 


I think it's going to work out fine in the space shown for the motor well in cockpit drawing in the plans.  Because of the 25-inch shaft, I can mount it a bit higher, which will help prevent it from drowning out in big waves.  It will still be pretty low overall in relation to the top of the aft beam, as you can see here:


The 25-inch shaft will keep the prop deep in the water, with cavitation unlikely.  Mounting it forward of the aft beam will also help with this and with proper weight distribution.  The board laying across the skids that the hulls are resting on in front of the prop shows that the prop can't hit bottom before the hulls do. 


I've also designed and built the aft net beam in the past few days.  I scrapped the idea of using the aluminum pole I had for this, as a wood-composite beam will be easier to mount things to and to finish in a way that matches the boat.  I used a V-shaped lamination for the bottom, fit into notches cut in the stern post.  The other board is the inner top plate, beveled to fit into the V.


Here is the next assembly step, putting the inner top plate in place with epoxy.


This  view of the unfinished end shows the final cross-section of the beam.  Built of Doug fir, it's plenty strong and stiff while still lightweight because of the hollow area.  The piece of wood on the forward edge that stops at the inside of the sternpost is a teak trampoline lashing rail that will be drilled on 3-inch centers for the aft tramp lacing.  I'm using teak for all the  lashing rails as the holes will be exposed to the weather and most other woods would rot in this use. The sharp edges of the beam corners will get a smooth radius and then the entire beam will be sheathed in fiberglass cloth.


Here's view looking aft to show how the beam fits.  The triangular design with the low, flat top will allow plenty of clearance for the tillers.  There's a lot of usable space back there between the sterns and the aft beam.  I can't imagine not having a net beam to take advantage of it.  Mine will have a drop-down ladder in the center with tramps to either side. 


Anchor handling and storage is often overlooked in the building phase of these boats, but any cruising boat, no matter how simple, relies on good ground tackle, and that ground tackle must be accessible and easy to handle.  To that end, I've built a custom anchor roller for the forward beam that nicely accommodates my 22 lb. Delta plow anchor.  Anchors in this configuration are difficult to stow anywhere but on a roller, as they are bulky, awkward and take up too much space inside lockers.  The roller housing is assembled here for fit, but will be removed for finishing before it is then filleted and glassed onto the beam. 


Here's the anchor, salvaged from my previous boat, a much heavier 26-foot monohull.  The Delta should be more than adequate as the main anchor on the Tiki.  If I were buying a new one, I would probably go with the highly-regarded Rocna design.  As it is, I have this one, as well as a smaller CQR and a large Danforth.  All three will be on board with appropriate rodes.  At the top of the beam, there will be a teak block to receive the shank and hold it in position, and a cleat to secure it with a short line through the forward eye. 


Another big project will be building the slatted deck forward, between the mast beam and the forward beam.  I've decided to go this route in lieu of a trampoline, as it is so much better to work on and will last longer.  It will also cost about the same or less, as I have ordered locally-grown select-grade southern bald cypress for the material.  I considered teak, like David used on his Tiki 30 forward deck, but prices have really gone through the roof, especially for what little teak is available in my area.  The cypress will be lighter weight anyway, and should last a long time with care and proper construction.  Below, I have mocked up some of the longitudinal stringers out of scrap wood just to get accurate measurements on the amount of material I will need.  The longitudinal stringers will hang under the mast and forward beams.  Then deck beams across will support the planking, which will put the top of it about even with the built-in ledge on the aft side of the forward beam, making it about 3 inches higher than the adjacent decks on the hulls.  The whole assembly will be easily removable as a single unit to aid in disassembly of the boat.

Monday, September 27, 2010

Beams Meet Hulls!

Hey, check it out, this thing I've been building all this time really is a catamaran!


Yesterday, I brought the crossbeams from the garage where I built them down to the shed where the hulls were built.


Today the hulls were rolled out into the open and aligned in the middle of the space between the shed and the house, where I have enough room to work and to step the mast later when it's time for that.  I leveled them and blocked them up using the two-wheel carts I made and a hydraulic floor jack. 

  
All this went surprisingly well, even single-handed, again making me glad I went with the Tiki 26 instead of a larger design.  I can easily manipulate these hulls for maintenance in the future.


These beams are still unfinished, of course.  I have a bit of glassing and lots of fairing to do before painting them, as well as the completion of the extra bits for the mast beam, such as the mast step reinforcement and the dolphin striker.


At this point, the beams are just strapped onto the inside lashing cleats to keep everything level and secure.  I will use rope lashings as in the plans for the final assembly.  The beam blocks on the decks will have to be shaped to fit the underside of the beams for a secure contact surface.  This could not be done until I reached this stage where the hulls are aligned and leveled with each other.  Before the final fitting, I'll fine tune everything with a water level to be sure they are exactly level at all four ends. 


Another project will be finishing the paint job on the stern decks, which have non-skid and primer, but no finish coats.  Then I'll hang the rudders and paint them in line with the bottom paint and topside paint.  And then build the tillers and the tiller bar.


And, there's the small matter of the cockpit and cockpit seats with storage under, and the motor well.  Then forward decks, aft boarding ladder, tramps, etc....  But it's starting to look like a boat, and that's inspiring.


Saturday, September 18, 2010

Port Hull Outside

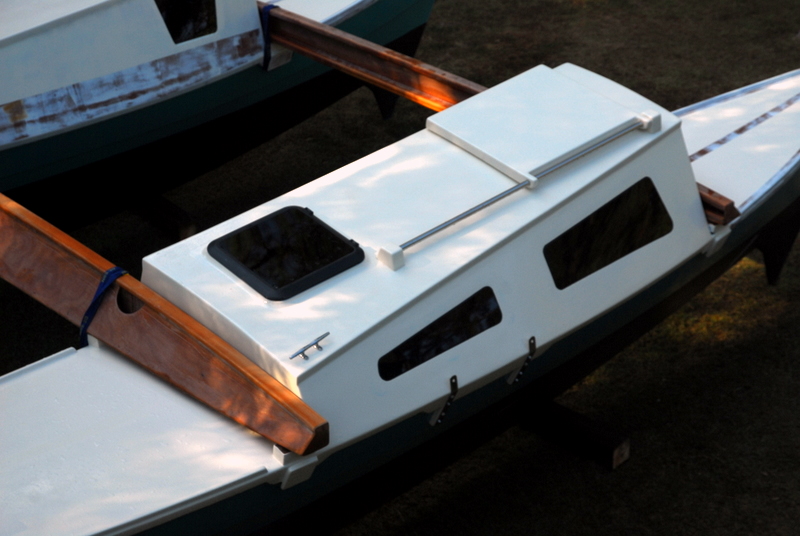
Yesterday I moved the port hull most of the way out of the building shed.  I was able to install the remaining two windows in each hull this week, despite my injured foot and ankle, so they are now fully "dried-in" and able to be left out in the open.  The starboard hull will come out next week after the sealant has a couple more days to dry.  I'm leaving the stern decks under cover until I get the non-skid and paint on them.  In the meantime, there is a lot of detailing to do on both the deck paint and the green topsides now that I have them out in the open where I can see and work free of the dust in the shed.  Here are a few pictures so you can see one of the hulls unobstructed for the first time:


The first step today was to wash all the dust off:


You can see that the stern deck here is not yet painted, only primed. 


I really like the way these flush-mounted windows came out....


This view shows the companionway hatch and opening hatch forward.  This is one Tiki 26 that will have lots of natural light and ventilation inside.